
How to Deploy Next js App/Site on Linode?
You'll learn to create a new VPS, configure your server to host Node.js applications, configure your domain name, use a Nginx server.

Full stack developer Meet/Discuss with me : https://cal.com/biomathcode
This articles takes a lot from https://www.coderrocketfuel.com/article/how-to-deploy-a-next-js-website-to-a-digital-ocean-server#create-and-configure-a-digitalocean-server
I recently tried to deploy my next js repo
Visit Here
You'll learn to create a new VPS (Virtual Private Server), configure your server to host Node.js applications, configure your domain name, use a Nginx web server as a reverse-proxy in front of your Next.js application, and setup HTTPS/SSL encryption so your website is served with https://
Before you begin this guide you'll need to have Node.js and NPM installed on your local development machine. Here is a installation guide if you need help getting those installed on your machine.
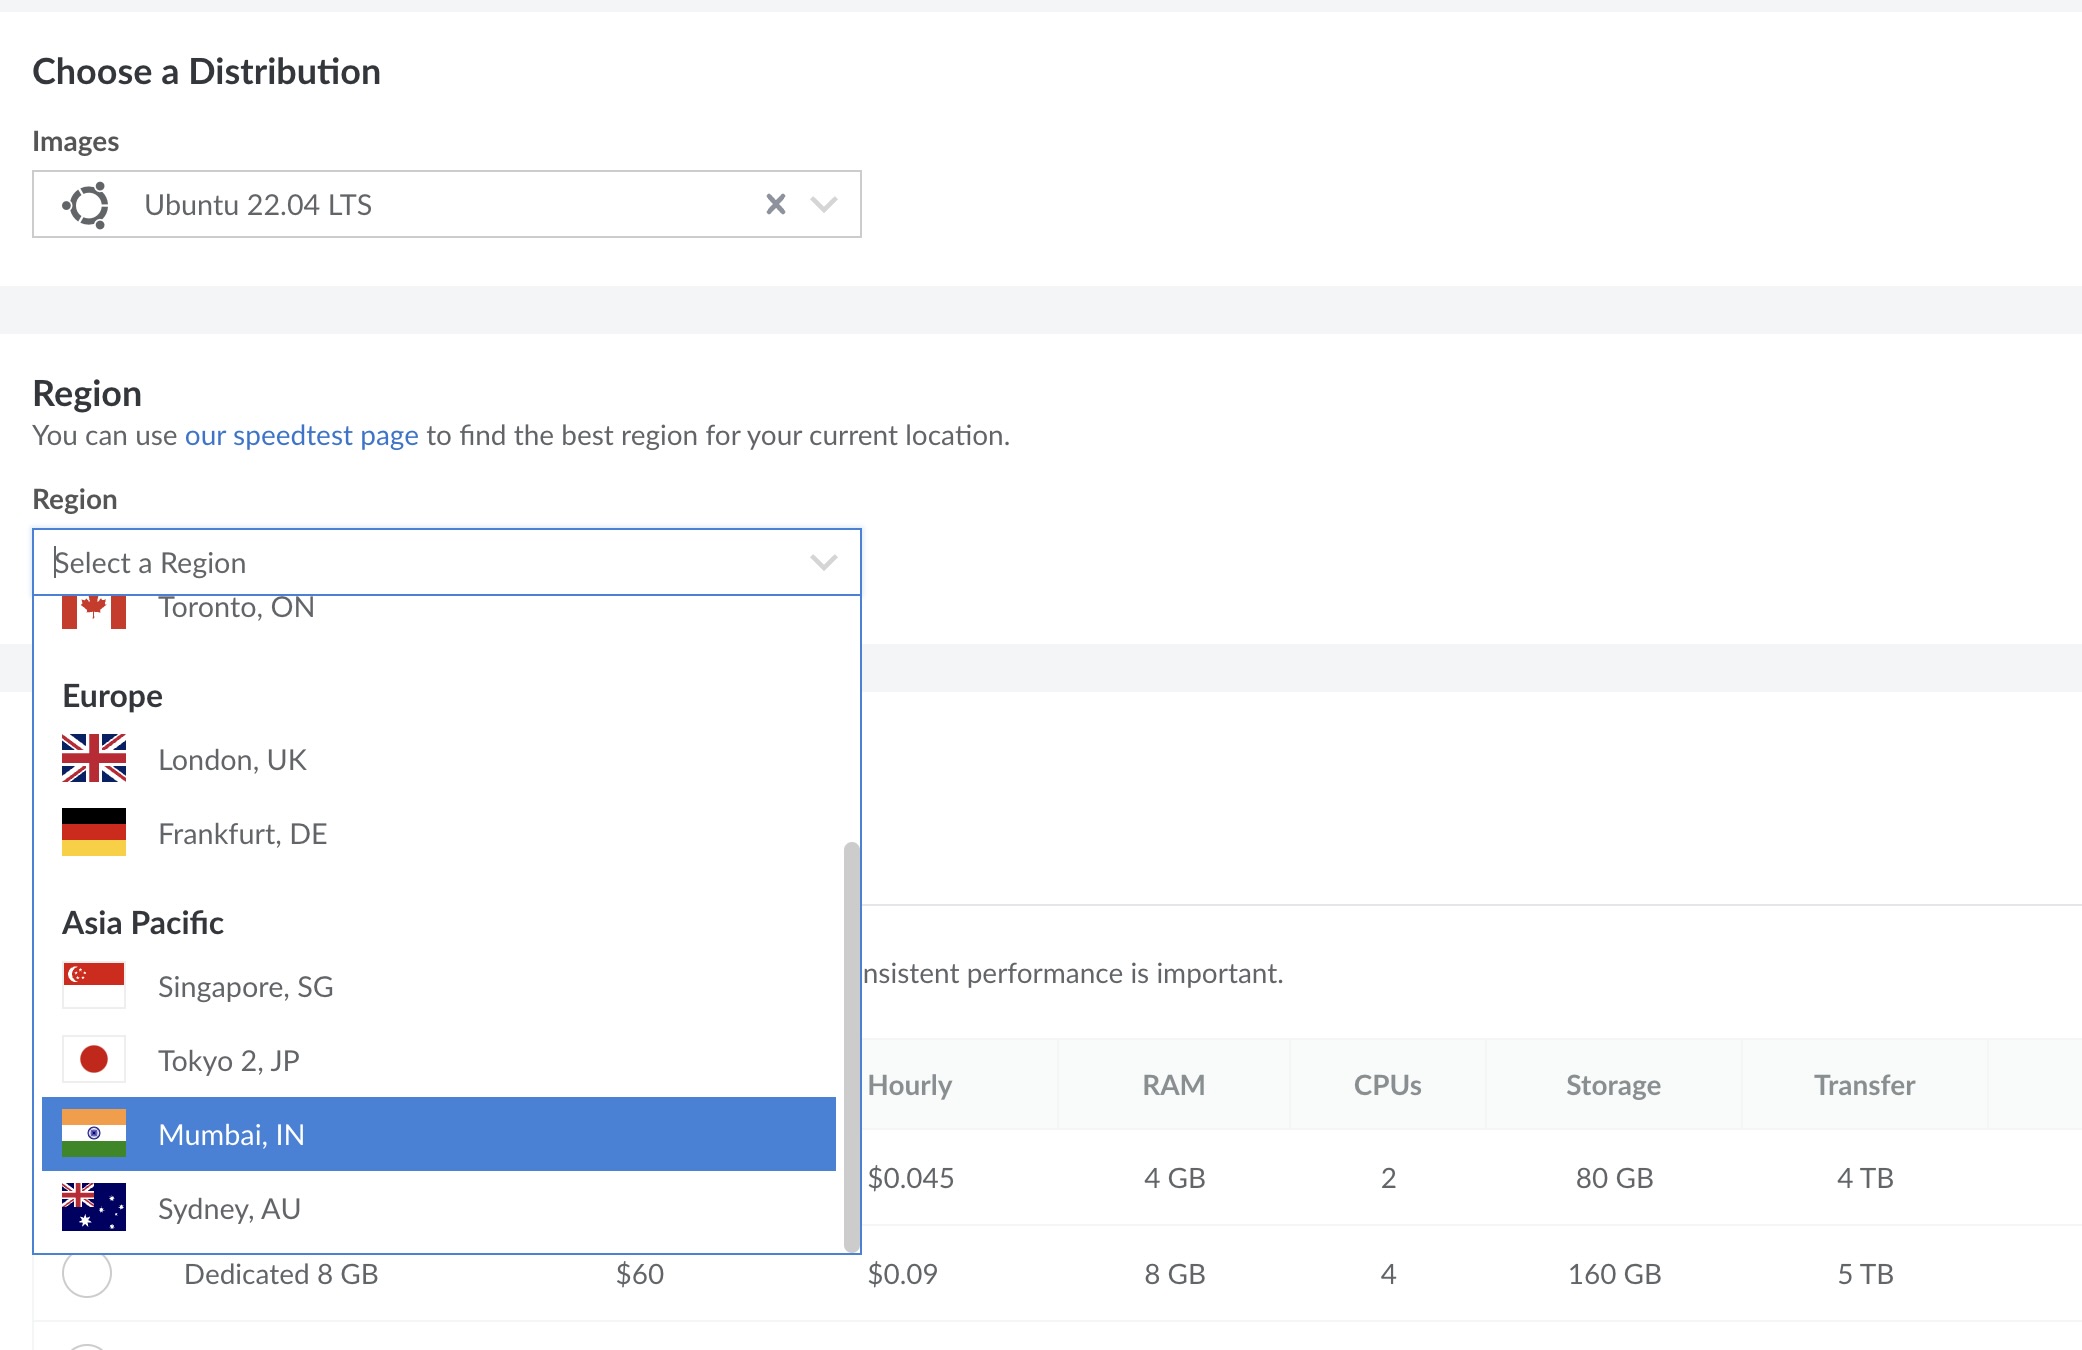
Create & Configure A Linode Server
Choose Ubuntu and Select region
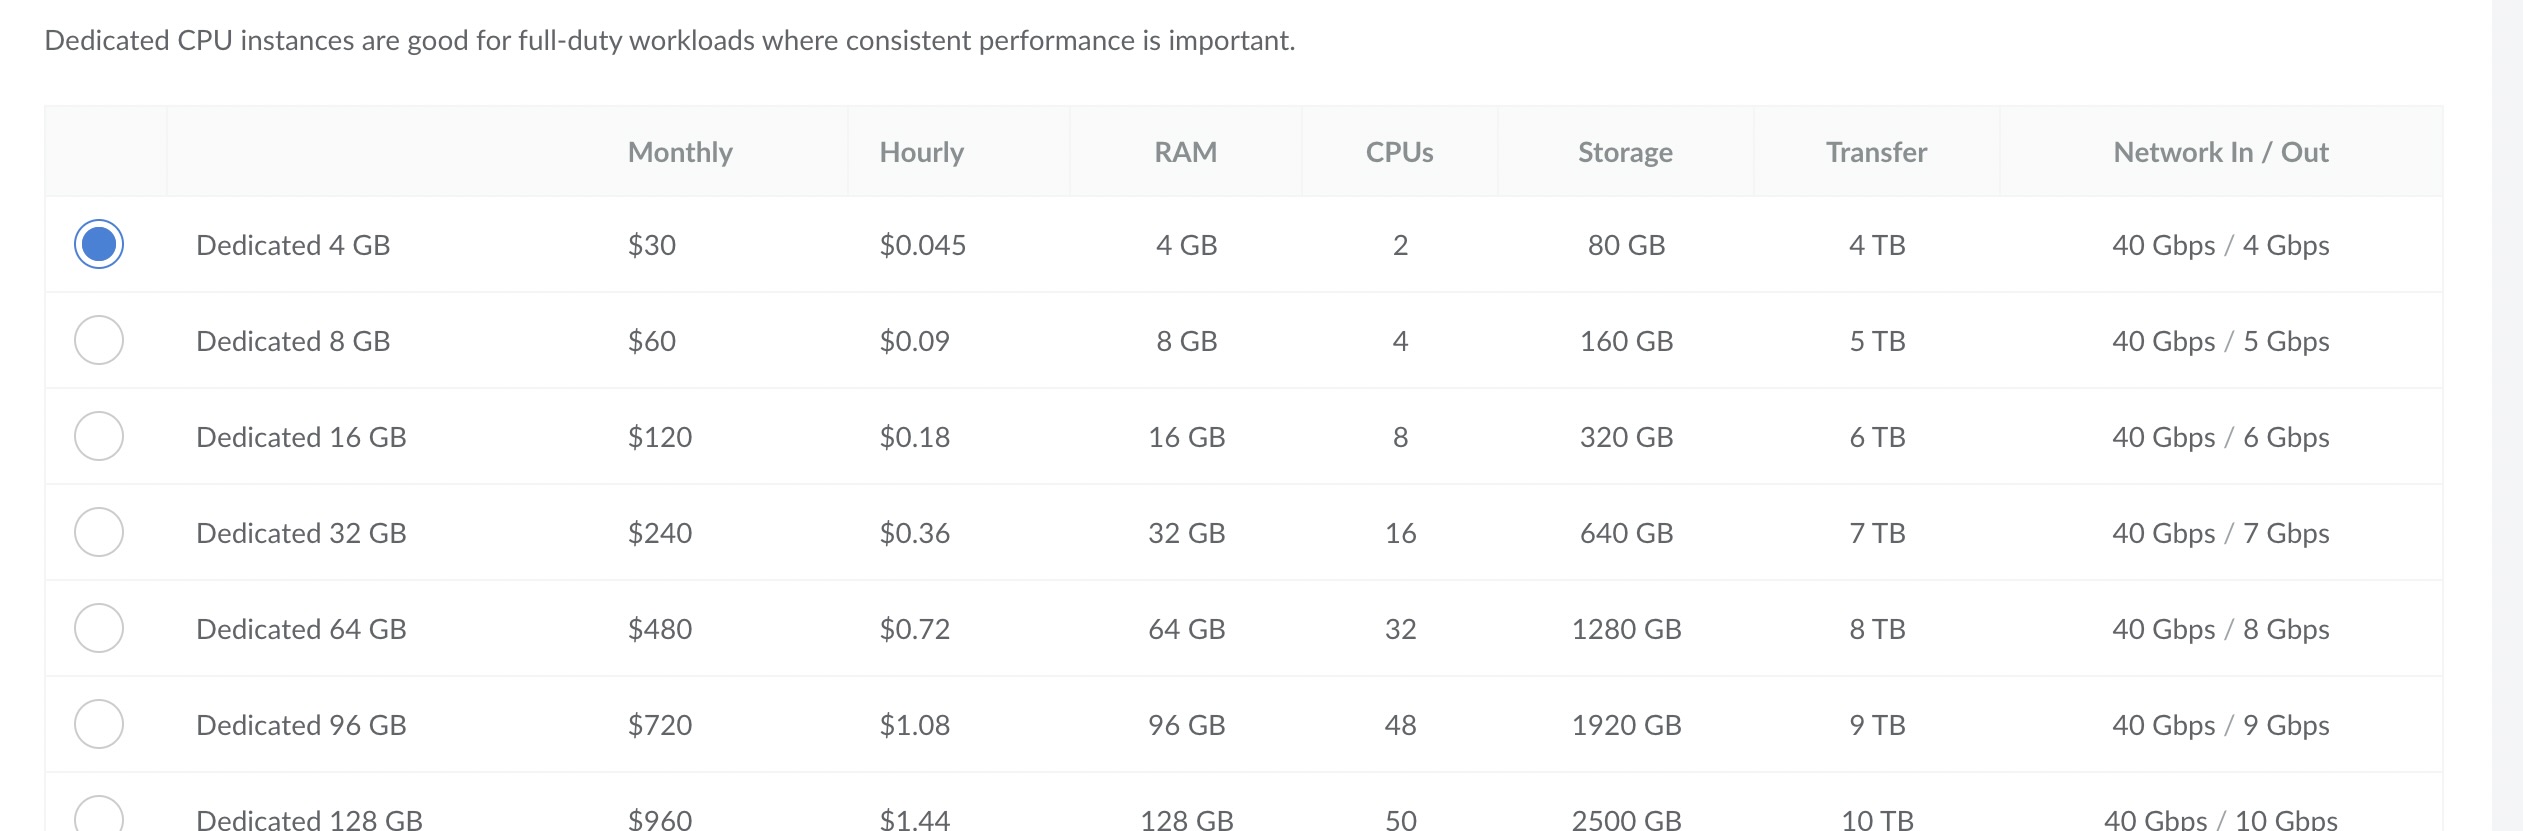
Select the first plan which will be enough for your initial application.
Add a
Root Password, which will be used to get access to the server node from your local terminal.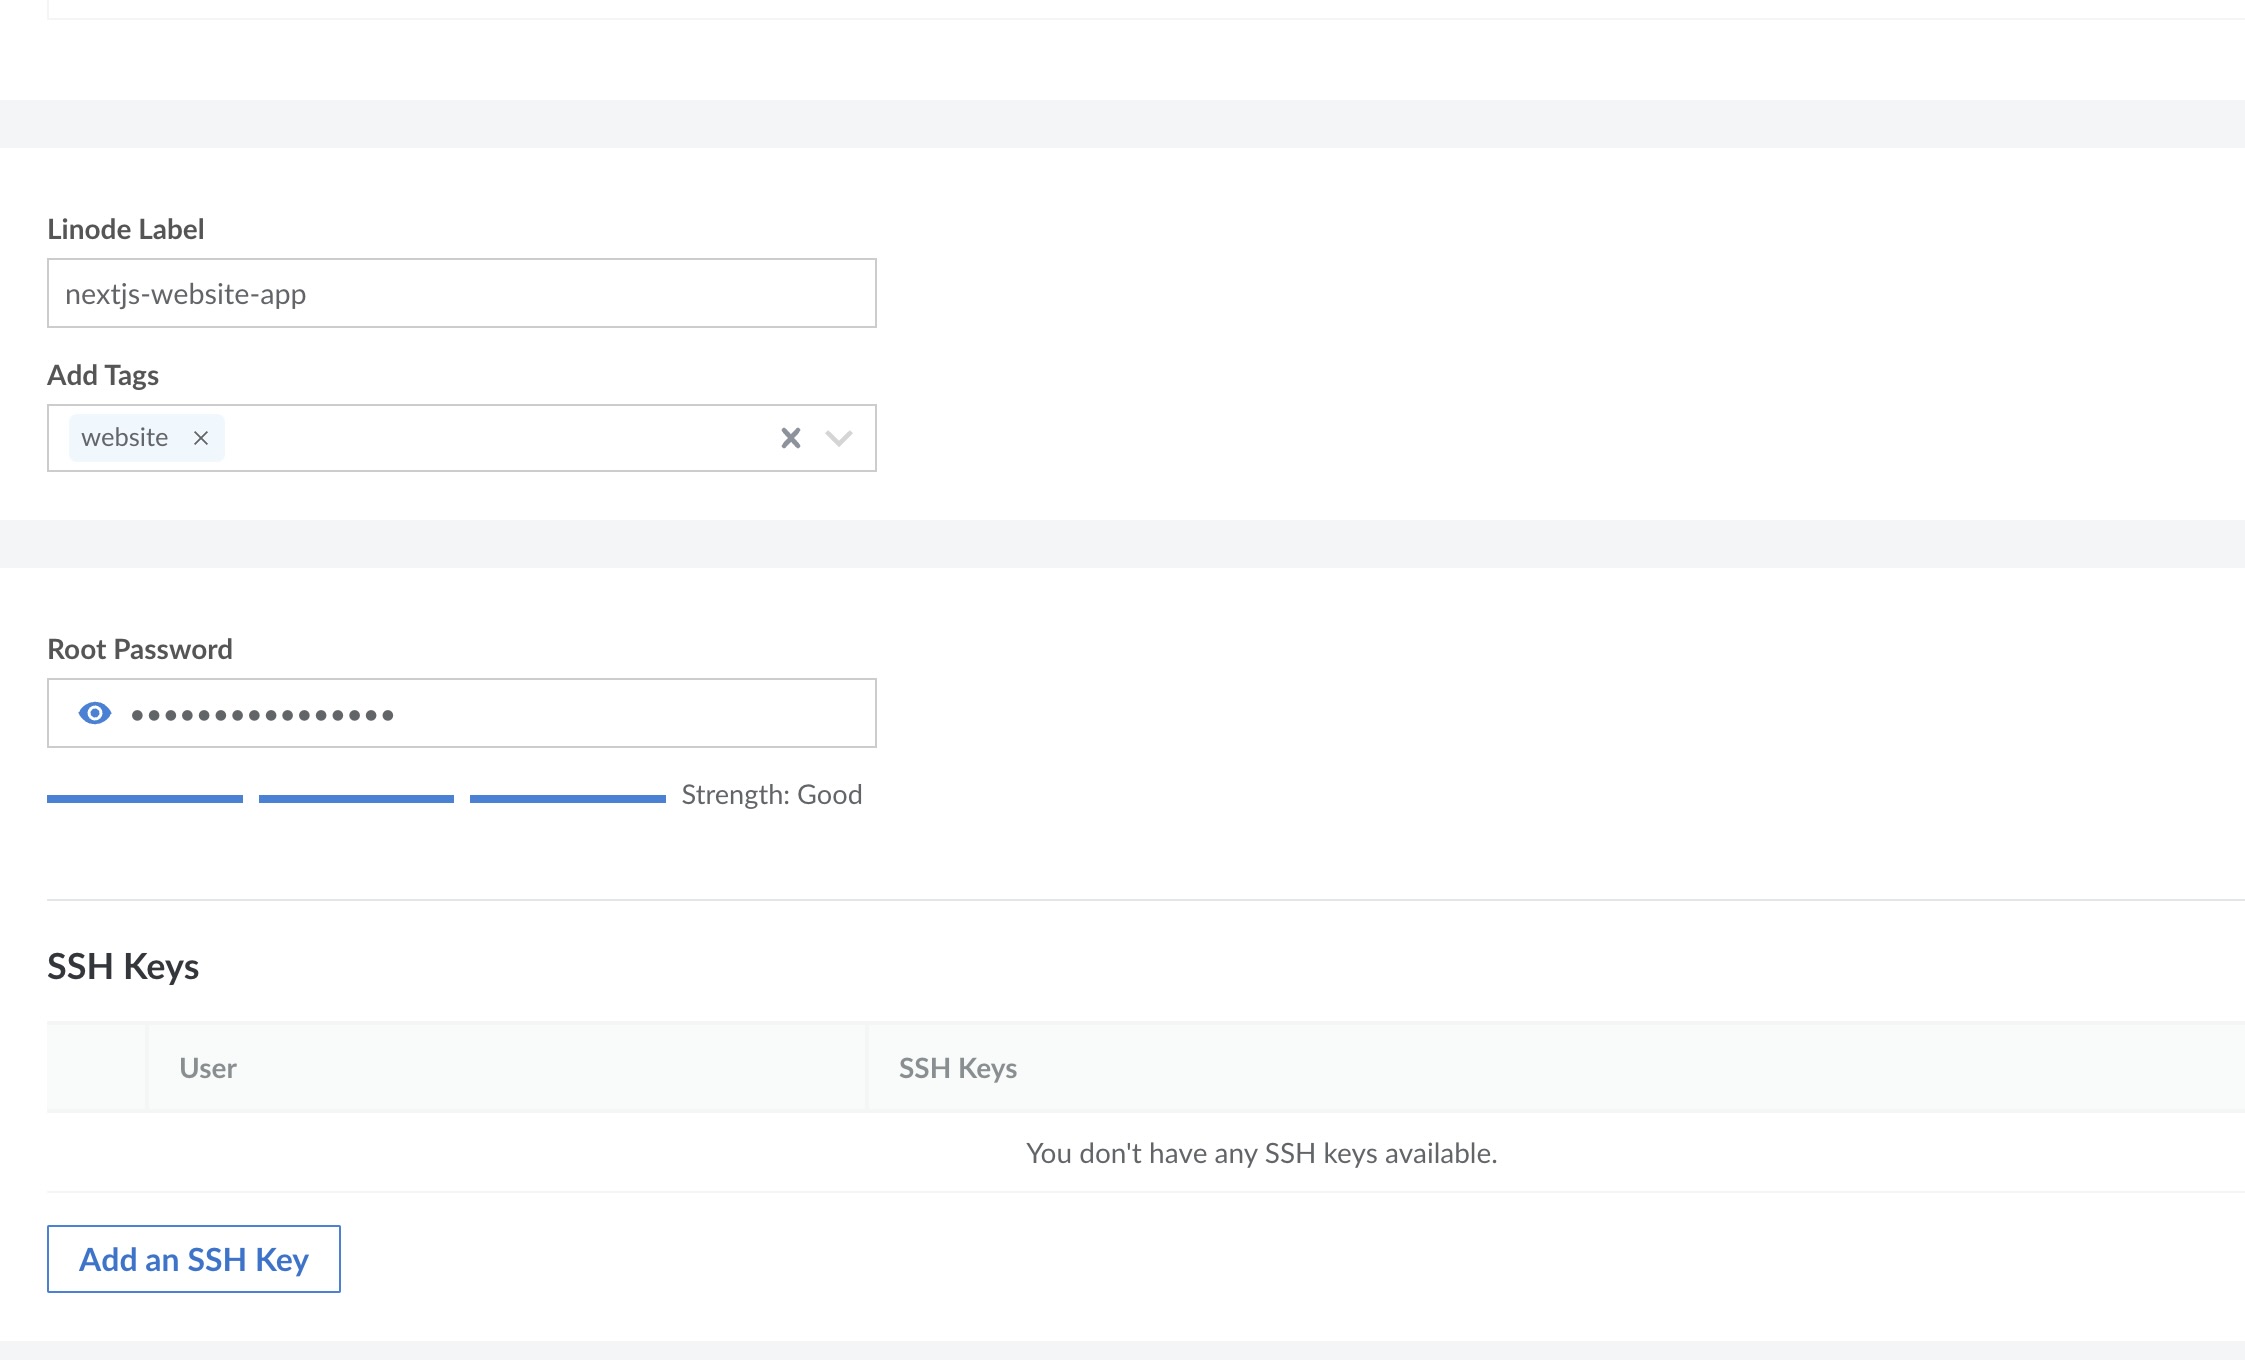
Click on create Linode.
Access The Server Using Root
This section has been removed to refer a better source :
https://www.linode.com/docs/guides/set-up-and-secure/
Please go through setting up linode instance access from your terminal. Checkmark to do this things.
- Connect to the Instance, based on your operating system.
- Rest in this article
admin, is equal toexample_namein the above article - Harden SSH Access
- Configure a Firewall
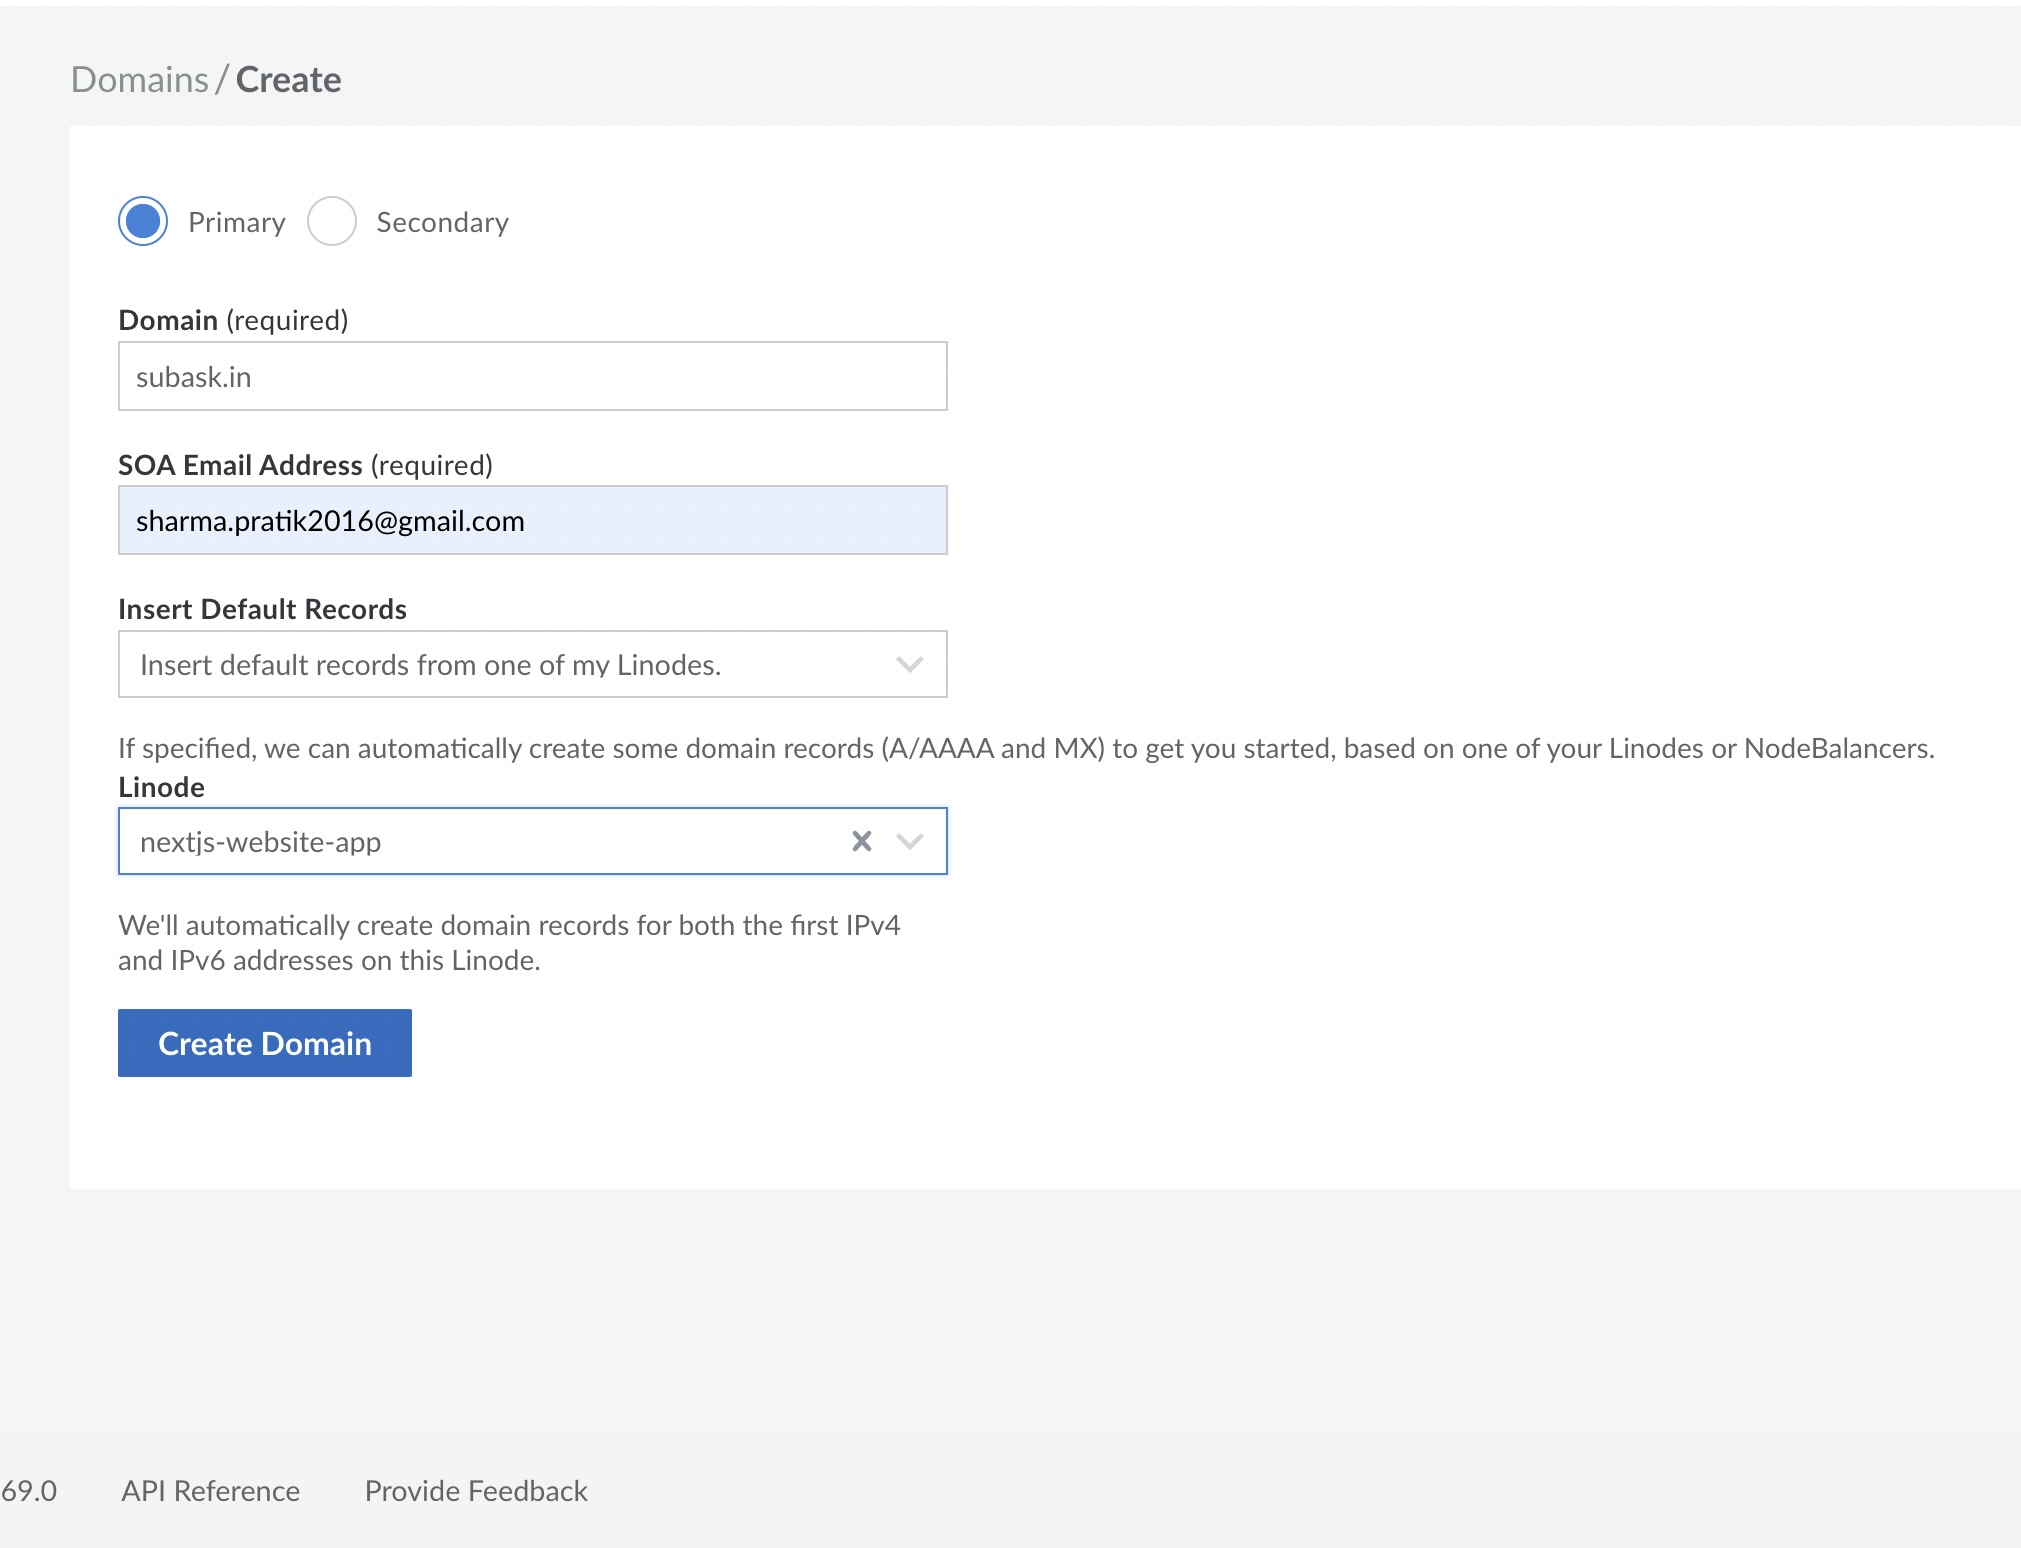
Configure A Domain Name
- Click on Create Domain
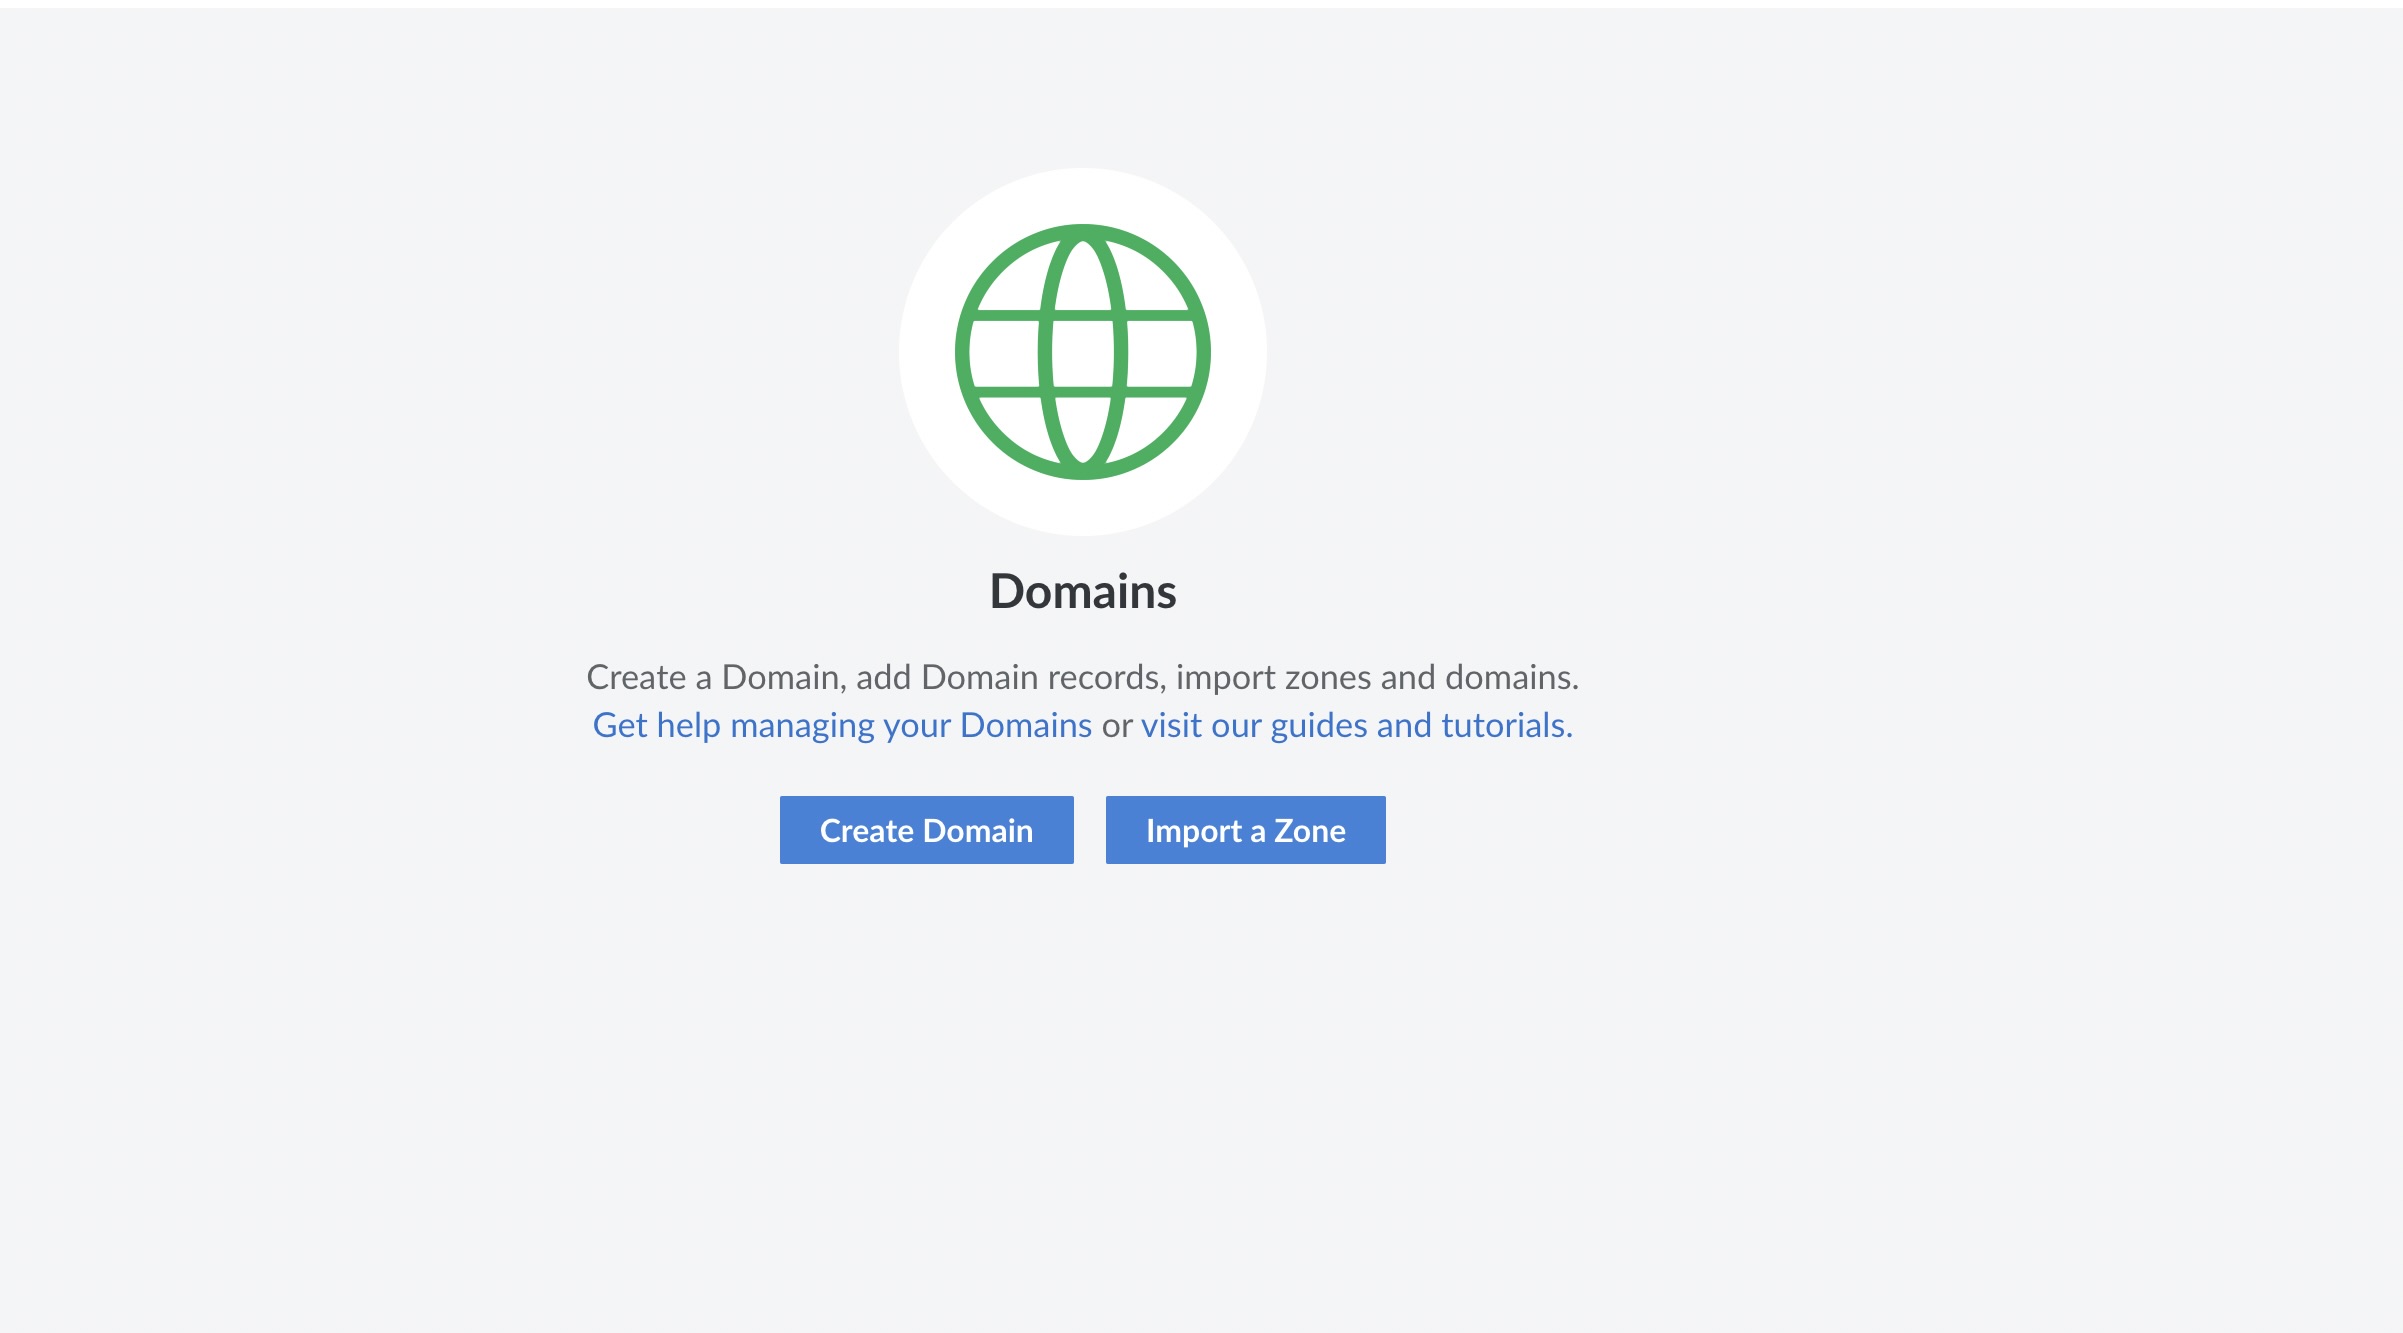
Add A domain that you own.
- Add this name server on your domain provider.
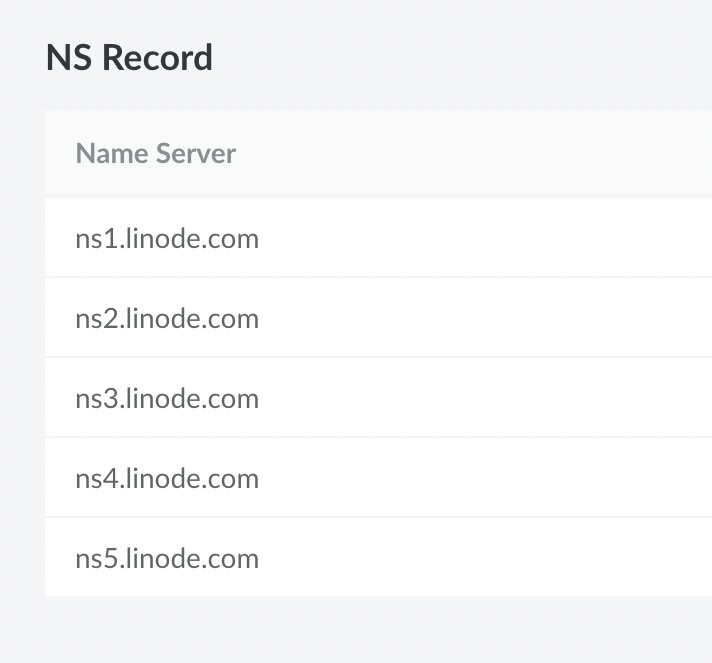
You should now have a domain pointing at your newly created Linode server.
Throughout the rest of this course, your domain will be referenced as example.com. So, whenever you see that domain going forward, make sure you replace it with the domain you just finished configuring.
In the next section, we'll return to your Linode server and get Nginx installed and configured.
Install & Configure Nginx
Now that your domain is pointing to your server, it's time to install Nginx and configure it as a reverse proxy so your Next.js application can be accessible by visitors via the browser.
We'll be using the Nginx web server software to host your applications. Nginx is one of the most popular web servers and helps host some of the largest and highest-traffic sites out there. It's more resource-friendly than Apache in most cases and can be used as either a web server or reverse proxy.
Let's get Nginx configured on your server.
Install Nginx
First, let's get Nginx installed on your server.
Nginx is available in Ubuntu's default repositories, so installation is pretty straightforward.
On your Linode server, run the following commands to update your local apt package index so we have access to the most recent package lists and install the nginx software:
Command
admin@/hostname:~$
sudo apt-get update && sudo apt-get install nginx
The apt-get command will install Nginx along with any other required dependencies.
When those commands finish, Nginx will be available for you to use on the server.
Adjust Firewall Settings
Before we can use Nginx, we need to reconfigure our firewall software to allow access to the service. Nginx registers itself as a service with ufw, our firewall, upon installation. This makes it rather easy to allow Nginx access.
We can list the applications configurations that ufw knows how to work with by typing:
Command
admin@/hostname:~$
sudo ufw app list
You should get a listing of the application profiles:
Output
Available applications:
  Nginx Full
  Nginx HTTP
  Nginx HTTPS
  OpenSSH
There are three profiles available for Nginx:
- Nginx Full: opens both port
80(normal, unencrypted web traffic) and port443(TLS/SSL encrypted traffic) - Nginx HTTP: opens only port
80(normal, unencrypted web traffic) - Nginx HTTPS: opens only port
443(TLS/SSL encrypted traffic)
It's recommended that you enable the most restrictive profile that will still allow the traffic you've configured. Since we haven't configured SSL for our server yet, we'll only need to allow traffic on port 80. When we set up SSL Encryption later on, we'll change these settings.
You can enable this by typing:
Command
admin@/hostname:~$
sudo ufw allow 'Nginx HTTP'
You can verify the change with this command:
Command
admin@/hostname:~$
sudo ufw status
You should see Nginx HTTP listed in the output.
Test Your Nginx Web Server
The Nginx web server should already be up and running.
To make sure the service is running, execute this command:
Command
admin@/hostname:~$
systemctl status nginx
It should output something that looks like this:
Output
● nginx.service - A high performance web server and a reverse proxy server
    Loaded: loaded (/lib/systemd/system/nginx.service; enabled; vendor preset: enabled)
    Active: active (running) since Mon 2016-04-18 16:14:00 EDT; 4min 2s ago
  Main PID: 12857 (nginx)
    CGroup: /system.slice/nginx.service
      ├─12857 nginx: master process /usr/sbin/nginx -g daemon on; master_process on
      └─12858 nginx: worker process
You can access the default Nginx landing page to confirm that the software is running properly. This can be accessed through your server's domain name or IP address in the browser.
When you have your server's IP address or domain, enter it into your browser's address bar: http://server_domain_or_ip_address.
You should see the default Nginx landing HTML page.
You now have a Nginx web server running on your server that is accessible to the world!
We'll come back to Nginx later on this section when we create a reverse-proxy for your application.
Install Node.js
To run your Next.js application, you'll need to have Node.js installed on your Linode server. Furthermore, you'll need to have Node.js version 10.13 or later for Next.js to work properly.
To make things easy, we'll use the NodeSource package archives to install Node.js.
First, you need to install the NodeSource PPA (Personal Package Archive) to get access to its contents. Make sure you're in the home directory on your Linode server:
Command
admin@/hostname:~$
cd ~
And use curl to retrieve the installation script for the Node.js 16.x archives (replace 16.x
with the version of Node.js you want to use):
Command
admin@/hostname:~$
curl -sL https://deb.nodesource.com/setup_16.x -o nodesource_setup.sh
And then run the nodesource_setup.sh script using sudo:
Command
admin@/hostname:~$
sudo bash nodesource_setup.sh
The PPA has now been added to your configuration and your local package cache should have automatically updated.
The nodesource_setup.sh script won't be needed again, so let's delete it:
Command
admin@/hostname:~$
sudo rm nodesource_setup.sh
You can now install the Node.js package with the following command:
Command
admin@/hostname:~$
sudo apt-get install nodejs
The nodejs package contains the nodejs binary as well as NPM, so you won't need to install NPM separately. But for some NPM packages to work, you'll need to install the build-essential
package:
Command
admin@/hostname:~$
sudo apt-get install build-essential
When that is done installing, Node.js should be fully installed and ready to use on your server.
You can test this by verifying the version of Node.js on your machine:
Command
admin@/hostname:~$
node --version
And the version of NPM:
Command
admin@/hostname:~$
npm --version
In the next sections, we'll use Node.js and NPM to configure and run your Next.js application.
Deploy The Next.js Application
Push Application Code To GitHub/Gitlab
First, we'll pull in the code we just pushed to GitHub and then we'll get the application running.
On your Linode server, make sure you are located in the home directory:
Command
admin@/hostname:~$
cd ~
Command
admin@/hostname:~$
git clone https://github.com/your_github_username/your_repository_name.git website
The website portion of the command will ensure the name of the project folder created is /website.
When the clone is complete, cd into the new /website directory:
Command
admin@/hostname:~/website$
cd website
And use the npm install
command to install all the NPM dependencies for your project:
Command
admin@/hostname:~/website$
npm install
When that's done, test the application by running the npm run dev
command:
Command
admin@/hostname:~/website$
npm run dev
You shouldn't encounter any errors and the terminal should output the same message as it did when we were in development mode on your local machine:
OUTPUT:
ready - started server on http://localhost:3000
Adding Environment Variables
We will add a .env file with our environment variables.
Command
admin@/hostname:~/website$
touch .env
Open the file in the terminal using nano, copy/ paste your environment variables here
Command
admin@/hostname:~/website$
nano .env
sample .env file will look like this
NEXTAUTH_URL = https://example.com

NEXT_AUTH_SECRET = you_secret_here

GITHUB_CLIENT_ID = your_github_app_client_id

GITHUB_CLIENT_SECRET = your_github_client_secret
Stop the application with the CTRL+C keyboard shortcut.
Now that we know everything is working, we need to use the npm run build function from the package.json file to create a production version of the Next.js application.
Still in the root of the /website project directory, execute this command:
Command
admin@/hostname:~/website$
npm run build
When it's complete, a new /.next folder will be created in your project directory. The production version of your website will be ran using the code in that folder.
When we run the application in production mode, we'll use the npm start command (instead of the npm run dev). So, let's start the application using that command:
Command
admin@/hostname:~/website$
npm start
If all went well, you should get this output in your terminal:
Ready on http://localhost:3000
Awesome! Your frontend website Next.js application is up and running on the server!
But how do we keep the application running forever, even if errors occur or in the rare scenario the entire machine needs to be restarted? In the next section, we'll introduce the PM2 NPM package to help us with that.
Install & Use PM2 To Run The Application
You're now ready to install and configure PM2, which is a process manager for Node.js applications. It will allow you to keep your Node.js application alive forever, reload it without any downtime and help facilitate common system administrative tasks.
Install the PM2 NPM package globally on your Linode machine with this command:
Command
admin@/hostname:~$
sudo npm install -g pm2
The -g option tells NPM to install the package globally. It'll now be available across your server's entire system.
Now we want to run the Next.js website application using PM2.
First, make sure you've navigated into the /website project directory:
Command
admin@/hostname:~$
cd website
Then, use this command to run the application with PM2:
Command
admin@/hostname:~/website$
pm2 start --name=website npm -- start
This will start your Next.js application and then display a table with its name, process ID, status, CPU usage, etc.
PM2 automatically adds an App Name and PM2 id to your application, along with other information such as the PID of the process, its current state, and memory usage.
The specific command we used gives the application the name of website within PM2. This will help us easily identify all the applications running within PM2 as we add more.
PM2 applications will be restarted automatically if the application crashes or is killed. But additional steps need to be taken for applications to start on system startup (reboot or boot). PM2 provides an easy way to do this with its startup command.
Run it with the following command:
Command
admin@/hostname:~/website$
pm2 startup systemd
On the last line of the resulting output, there will be a command that you must run with superuser privileges:
Output
[PM2] Init System found: systemd
[PM2] You have to run this command as root. Execute the following command:
sudo env PATH=$PATH:/usr/bin /usr/lib/node_modules/pm2/bin/pm2 startup systemd -u admin --hp /home/admin
Copy and paste the command that was generated (same as above but with your username instead of admin) to have PM2 always start when your server is booted.
Your command will look similar to this:
Command
admin@/hostname:~$
sudo env PATH=$PATH:/usr/bin /usr/lib/node_modules/pm2/bin/pm2 startup systemd -u admin --hp /home/admin
This will create a systemdunit that will run PM2 for your user on boot. This PM2 instance, in turn, will run all the applications configured to run using PM2. To check the status of the new systemd
unit, use the following command:
systemctl status pm2-admin
Your Next.js website application is now up and running on port 3000 and will run forever, or until you tell PM2 to stop.
In the future, you'll most likely need to push new code updates. To do so, you can follow these steps:
- Push code changes to GitHub/Gitlab.
- SSH into your DigitalOcean server (i.e.
ssh admin@example.comcommand via a terminal window). - Remove the current
/websitedirectory withsudo rm -r website(PM2 will continue to run a cached version of the application, so website downtime won't be an issue). - Clone your GitHub repository with
git clone https://github.com/your_github_username/your_repository_name.git website. - Install the project's NPM dependencies with
npm install. - Run the Next.js build process with
npm run build. - Restart the PM2 process with
pm2 restart website.
In the next section, we'll setup a Nginx reverse-proxy in front of your Next.js application to make it accessible to the world.
Configure Nginx As A Reverse Proxy
Now that your application is running and listening on localhost:3000, we need to make it so people from the outside world can access it. To achieve this, we will use Nginx as a reverse-proxy.
On Debian systems (i.e. Ubuntu), Nginx server configuration files are stored in /etc/nginx/sites-available directory, which are enabled through symbolic links to the /etc/nginx/sites-enabled directory.
Therefore, we need to create a configuration file in the /etc/nginx/sites-available directory that will instruct Nginx how to serve our application and at what URLs to serve it to.
First, navigate to the /etc/nginx/sites-available directory:
Command
admin@/hostname:~$
cd /etc/nginx/sites-available
Then, create a new configuration file for your website (you'll need to use sudo
for any changes you make in these configuration files):
Command
admin@/hostname:~/sites-available$
sudo touch example.com
To keep things organized, we suggest naming each Nginx configuration file after the URL they're created for.
Open that file for editing using nano:
sudo nano example.com
File
/etc/nginx/sites-available/example.com
server {
        listen 80;
        listen [::]:80;

        root /var/www/html;
        index index.html index.htm index.nginx-debian.html;

        server_name _;

        location / {
                try_files $uri $uri/ =404;
        }
}
These are the contents of the default Nginx configuration file, but with all the commented out lines removed for brevity. Also, the default_server designation for the listen directives (listed 80; and listen [::]:80;) are removed. Only one server block can have the default_server option enabled, which is already occupied by the /sites-available/default configuration file.
The first thing we need to modify in this file is the domain URL and any other aliases to match requests for. To do this, replace the server_name _; line with the following:
File
/etc/nginx/sites-available/example.com
server_name example.com www.example.com;
Make sure you replace example.com and www.example.com with your URLs.
This configuration file is also telling Nginx to serve the content of the /var/www/html directory, which is a default file generated by Nginx. To change that to instead serve our Next.js application running on localhost:3000, update the location section to this:
File
/etc/nginx/sites-available/example.com
location / {
        proxy_pass http://localhost:3000;
        proxy_http_version 1.1;
        proxy_set_header Upgrade $http_upgrade;
        proxy_set_header Connection 'upgrade';
        proxy_set_header Host $host;
        proxy_cache_bypass $http_upgrade;
}
With those settings, Nginx will serve the application running at http://localhost:3000, which we just finished configuring in the last section.
When you're done, the entire file should look similar to this:
File
/etc/nginx/sites-available/example.com
server {
        listen 80;
        listen [::]:80;

        root /var/www/html;
        index index.html index.htm index.nginx-debian.html;

        server_name example.com www.example.com;

        location / {
                proxy_pass http://localhost:3000;
                proxy_http_version 1.1;
                proxy_set_header Upgrade $http_upgrade;
                proxy_set_header Connection 'upgrade';
                proxy_set_header Host $host;
                proxy_cache_bypass $http_upgrade;
        }
}
Save and exit the file when you're finished making changes.
Now that we have the server block file created, we need to enable it. We can do this by creating symbolic links from these files to the /sites-enabled directory, which Nginx reads from during startup.
We can create the symbolic link with this command:
Command
admin@/hostname:~$
sudo ln -s /etc/nginx/sites-available/example.com /etc/nginx/sites-enabled/
Make sure you replace the example.com portion of the command with the name of your configuration file.
Your configuration file is now symbolically linked to the /sites-enabled directory.
To avoid a hash bucket memory problem in the future when we add additional applications, we need to adjust a single line in the /etc/nginx/nginx.conf file.
Open the file using nano:
Command
admin@hostname:~$
sudo nano /etc/nginx/nginx.conf
In that file, find a commented out line that reads # server_names_hash_bucket_size 64;
and remove the comment #symbol to uncomment the line:
/etc/nginx/nginx.conf
http {
    . . .

    server_names_hash_bucket_size 64;

    . . .
}
Save and close the file when you're done.
Next, use the nginx -t command to test that there are no syntax errors any of the Nginx files you just edited or created:
Command
admin@/hostname:~$
sudo nginx -t
If no problems were found, restart Nginx to enable the changes you made:
Command
admin@/hostname:~$
sudo systemctl restart nginx
Nginx should now be serving the Next.js application at your domain (www.example.com).
Open a browser and navigate to your domain. You should see your website!
In the next section, we'll set up SSL encryption so your website can be served over https://.
Configure HTTPS/SSL Encryption
Next, we'll use both the Let's Encrypt service and the Certbot software to obtain and install free SSL certificates for the example.com and www.example.com URLs.
Let's Encrypt is a Certificate Authority (CA) that provides an easy way to obtain and install free SSL certificates, thereby enabling encrypted HTTPS on web servers. It simplifies the process by providing a software client, Certbot, that attempts to automate most (if not all) of the required steps.
Let's get it done!
Install Certbot
First, we need to install the Certbot software on your server.
You can add the repository to your machine with this command:
Command
admin@/hostname:~$
sudo add-apt-repository ppa:certbot/certbot
You'll need to press ENTER to accept.
Then, update the package list on your machine to pick up the Certbot repository's package information:
Command
admin@/hostname:~$
sudo apt-get update
And then install the Certbot package:
Command
admin@/hostname:~$
sudo apt-get install python3-certbot-nginx
The Certbot software is now ready to use on your server.
Update Firewall To Allow HTTPS
Previously, we configured the ufw firewall on your server to allow HTTP traffic. To additionally let in HTTPS traffic, we need to allow the Nginx Full profile and then delete the redundant Nginx HTTP allowance.
Here is the command to allow Nginx Full:
Command
admin@/hostname:~$
sudo ufw allow 'Nginx Full'
And here is the command to delete the redundant Nginx HTTP
profile:
Command
admin@/hostname:~$
sudo ufw delete allow 'Nginx HTTP'
We're now ready to run Certbot and configure SSL certificates for your website.
Obtain SSL Certificates
Certbot provides a variety of ways to obtain SSL certificates, through various plugins. The Nginx plugin will take care of reconfiguring Nginx and reloading the Nginx configuration files whenever necessary.
To get SSL certificates for your example.com and www.example.com URLs, use this command (make sure to use your URLs):
Command
admin@/hostname:~$
sudo certbot --nginx -d example.com -d www.example.com
This command runs certbot with the --nginx plugin and also uses the -d directive to specify the names we want certificates to be valid for.
Since this is the first time you've run Certbot on the machine, you'll be prompted to enter an email address and asked to agree to the terms of service.
After doing so, Certbot will communicate with the Let's Encrypt server, then run a challenge to verify that you control the domain you’re requesting a certificate for.
If that’s successful, Certbot will ask how you’d like to configure your HTTPS settings.
The redirect option (Option 2) is the suggested choice. Select your choice then hit ENTER. The configuration will be updated, and Nginx will reload to pick up the new settings.
Your certificates are now downloaded, installed, and loaded. Go to your browser window and try reloading the website using https:// instead. The site should now be served using https://.
The last thing we need to do is test the certificate renewal process.
Let's Encrypt’s certificates are only valid for ninety days. This is to encourage users to automate their certificate renewal process.
The certbot package we installed takes care of this for us by running certbot renew twice a day via a systemd timer. On non-systemd distributions, this functionality is provided by a script placed in /etc/cron.d. This task runs twice a day and will renew any certificate that’s within thirty days of expiration.
To test the renewal process, you can do a dry run with certbot:
Command
admin@/hostname:~$
sudo certbot renew --dry-run
If you don't see any errors, you're good to go!
When needed, Certbot will renew your certificates and reload Nginx to pick up the changes. If the automated renewal process fails, Let's Encrypt will send a message to the email you specified, warning you when your certificate is about to expire.
Your Next.js website is now fully deployed!